

How To Clean Var Cache
Let's say you need to free up space on Ubuntu — how do you go about it?
Unlike Windows, which comes with built-in defrag and disk clean-up tools, Ubuntu doesn't make itimmediately obvious how you go about trying to free up space.
So what do you do once you've emptied the trash and deleted those sizeable .ISO downloads? How do you recover more space?
Below, we show you 5 super simple (and in some cases blindingly obvious yet easily forgotten) steps you can take to get back GBs, materialise MBs, and clean out the KB cruft!
Next time you need more space — and heck: even if you don't — here are 5 simple ways to free up disk space on Ubuntu.
1. Clean the APT Cache (And Do It Regularly)
It sounds so obvious yet chances are you haven't done this for a while.
By default Ubuntu keeps every update it downloads and installs in a cache on your disk, just in case you ever need it again.
This is useful if you regularly add and remove apps, find yourself needing to reconfigure/reinstall a specific package, or simply have a poor connection.
But the flip side is that the apt package cache can quickly swell to several hundred MBs. This command tells you how big your apt cache is:
du -sh /var/cache/apt/archives
To clean the apt cache on Ubuntu simply run the following command.
sudo apt-get clean
The apt clean command removes ALL packages kept in the apt cache, regardless of age or need. If you're on a slow, capped or intermittent connection you may want to consider skipping this step.
2. Remove Old Kernels (If No Longer Required)
Now, admittedly, this step is one you want to approach with caution.
Having a choice of kernels to boot up is, honestly, quite handy, especially if you notice something has gone awry while using the latest one.
Unless you're in the throes of constant hardware woes there's little need to hoard kernels.
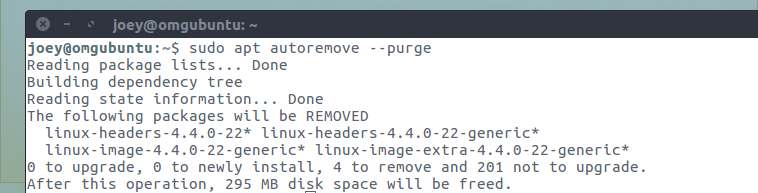
It's easy to remove old kernels in Ubuntu. You can do it from the command line using the following command:
sudo apt-get autoremove --purge
Note that this command will only remove kernels that a) are no longer needed and b) were installed from the Ubuntu archive through system updates. If you install kernels manually or using a third-party PPA you'll need to roll up your sleeves and remove those manually.
3. Uninstall Apps & Games You Never Use (And Be Honest!)
Chances are you have a number of apps installed that you never use. Maybe you installed them on the back of an awesome review, out of nosiness, or to tackle a specific task.
Whatever the excuse, if you no longer need an app, and it's taking up space, don't be afraid to uninstall it.
Typical apps you may wish to expunge include web browsers (are you ever going to use Opera, Epiphany, Midori and Min?), music players (heck knows there's enough of 'em) and games that sounded good in the Steam Store blurb but were as much fun as a Windows 10 update combo!
And everyone hasLibreOffce Draw knocking about doing nothing! 😅
Don't lie to yourself about might-needs and could-dos, either. The beauty of most software is that it's not going away anytime soon. This is never truer than on Linux, where apps remain anapt install command away.
To remove apps from the command line run:
sudo apt-get remove package-name1 package-name2
To remove excess packages and dependencies that are no longer required (because you've uninstalled other packages or newer versions have replaced them) run the following command:
sudo apt-get autoremove
4. Use A System Cleaner like BleachBit
Writing a "to-do" list on system cleaning would end up 10x longer if we listed every app, cache, log and system process hiding in every nook and cranny of your OS.
BleachBit saves us from doing that.
It's like CCleaner for Linux; a byte scouring beast. The app can find and clean pretty much every fluff file there is and, as a result, should only ever be used with caution.
BleachBut can wipe the caches of more than 70 popular desktop applications (including most web browsers); hoover up old file, browser and bash histories; and makes light work of those crash logs you'll never get around to reading.
No surprise that we recommend installing it as one of our top things to do after installing Ubuntu.
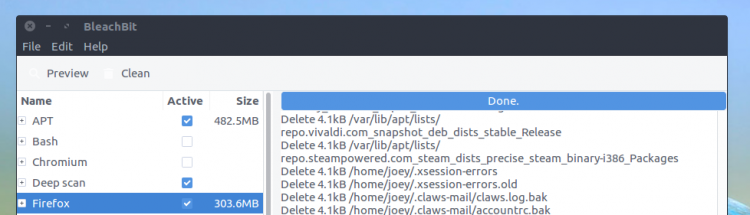
You can install BleachBit on Ubuntu 16.04 LTS (and above) straight from Ubuntu Software.
Run the app as root for maximum cleaning power. Check the boxes beside the things you'd like to clean. Click Preview to see an estimate of how much space they currently take up, and click Clean to remove them.
Install BleachBit from Ubuntu Software
5. Stay up to date (seriously, do it!)
The most obvious step on this list is also the one few people would think to recommend. See, unlike Windows, where every new update adds more overhead and bloat, package updates on Linux oftenfree space rather than use it.
So next time you put off that 156MB librandom-package102 update cos you're running low on space, maybe think again!
Summary
That just about covers it. If you only remember two steps from this list make it the first and last.
- Clean your apt cache from time-to-time
- Install patches, updates, and fixes
Now go forth and free space!
Let us know how much space you manage to claw back or share your own top space-saving tips in the comments!
How To Clean Var Cache
Source: https://www.omgubuntu.co.uk/2016/08/5-ways-free-up-space-on-ubuntu
Posted by: saxontiontems.blogspot.com
0 Response to "How To Clean Var Cache"
Post a Comment