

How To Clear Disk Space On Windows
Summary :
If your Windows 10 is running on low disk space, you are probable to find the well-nigh suitable solution here forDisk cleanup Windows x. Here 9 solutions are listed. Read and try them out!
Quick Navigation :
- Fix #1: Upgrade Hard Drive
- Set #2: Empty Recycle Bin
- Prepare #three: Deejay Cleanup
- Fix #4: Enable Storage Sense
- Fix #5: Uninstall Apps You lot Never Utilize
- Set #6: Employ OneDrive Files on Demand Feature
- Fix #vii. Use Meaty Os
- Prepare #8. Disable Hibernation on Windows 10
- Ready #9. Move Files to External Hard Drive
- Bottom Line
- User Comments
Earlier trying the nine means to make clean upward deejay space, you can try Disk Cleanup beginning. What Disk Cleanup is? What does Disk Cleanup practice? It is a maintenance tool that scans your reckoner's hard drive for files that you don't need. When your Windows 10 is running on low disk infinite, yous can apply the tool. Simply if it does little aid, you are likely to notice the most suitable solution here forDeejay cleanup Windows 10.
Fix #i: Upgrade Hard Bulldoze
Sounds wired? We will explain. Although there are several solutions (Gear up #2-ix) that assistance estimator cleanup, the allocated free space is express to a great extent. In fact, the best mode is to upgrade hard drive to a larger one. To transfer Windows 10 as well every bit all data on the hard drive, MiniTool Partition Wizard Free is recommended here for its 2 useful features:
- "Migrate Os to SSD/Hd" helps migrate Windows 10 to another hard bulldoze similar an SSD.
- "Copy Disk" helps clone the whole system disk to another hard bulldoze that offers larger capacity.
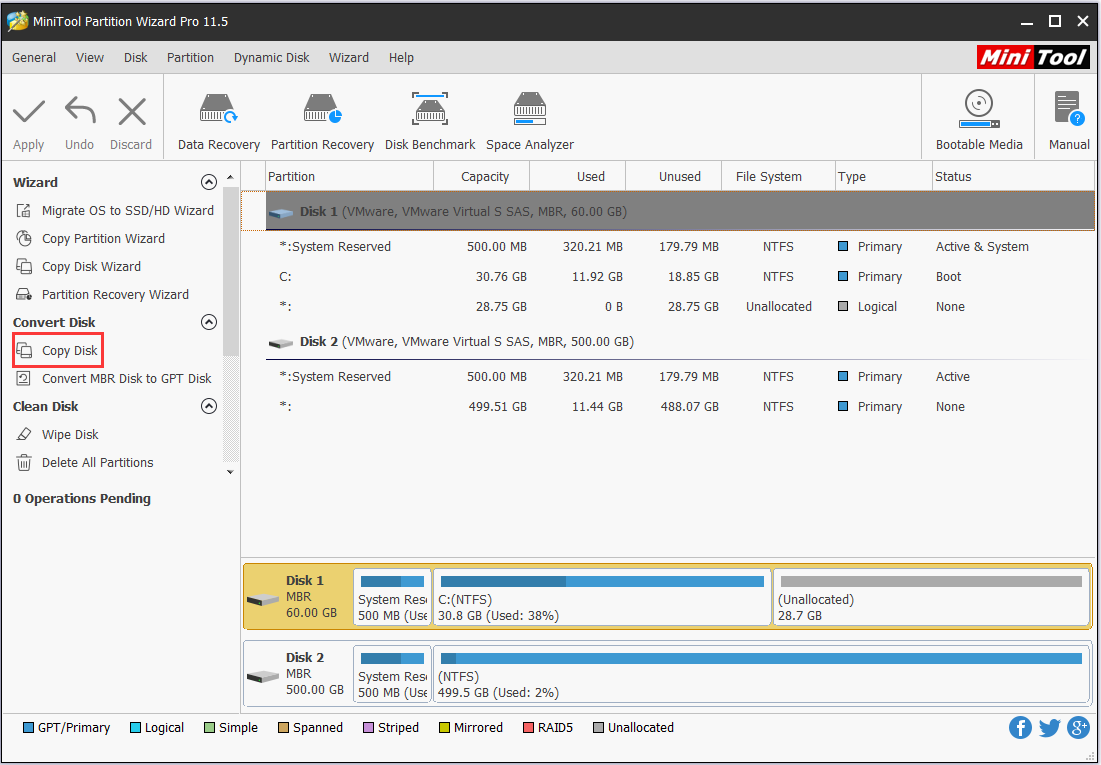
Have "Copy Disk" feature for example. First of all press the push button below to become this free segmentation managing director.
Complimentary Download
Footstep i: Connect the larger SSD/Hard disk drive that yous want to use equally the new organisation deejay to your PC. Ensure information technology is successfully detected past Windows and tin can be formatted.
Step 2: In the master interface of MiniTool Partition Sorcerer Free, yous can meet that the organisation disk is selected by default. Please select "Re-create Disk" from the activity panel.
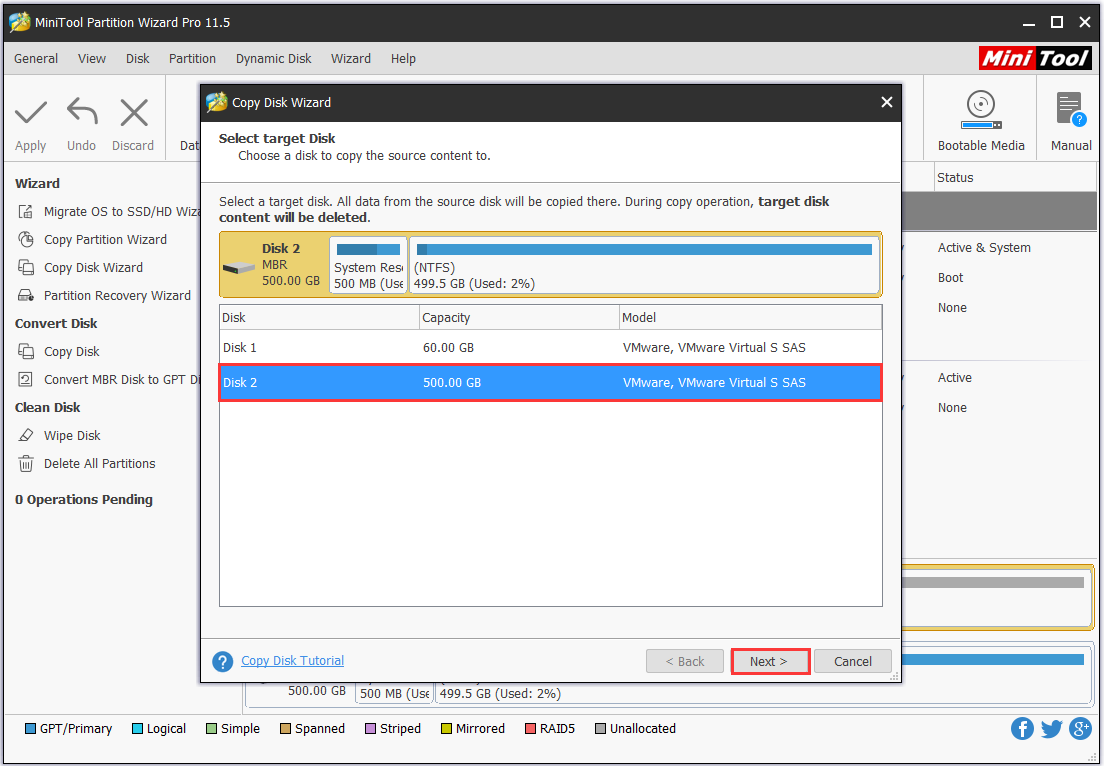
Step iii: In the next popular-upwards window, select the new connected SSD/HD as the target disk.
Step 4: Accept the default copy options or make some changes. Be aware that the last option "Use GUID Partition Table for the target disk" is a paid feature that helps clone MBR system deejay to GPT.
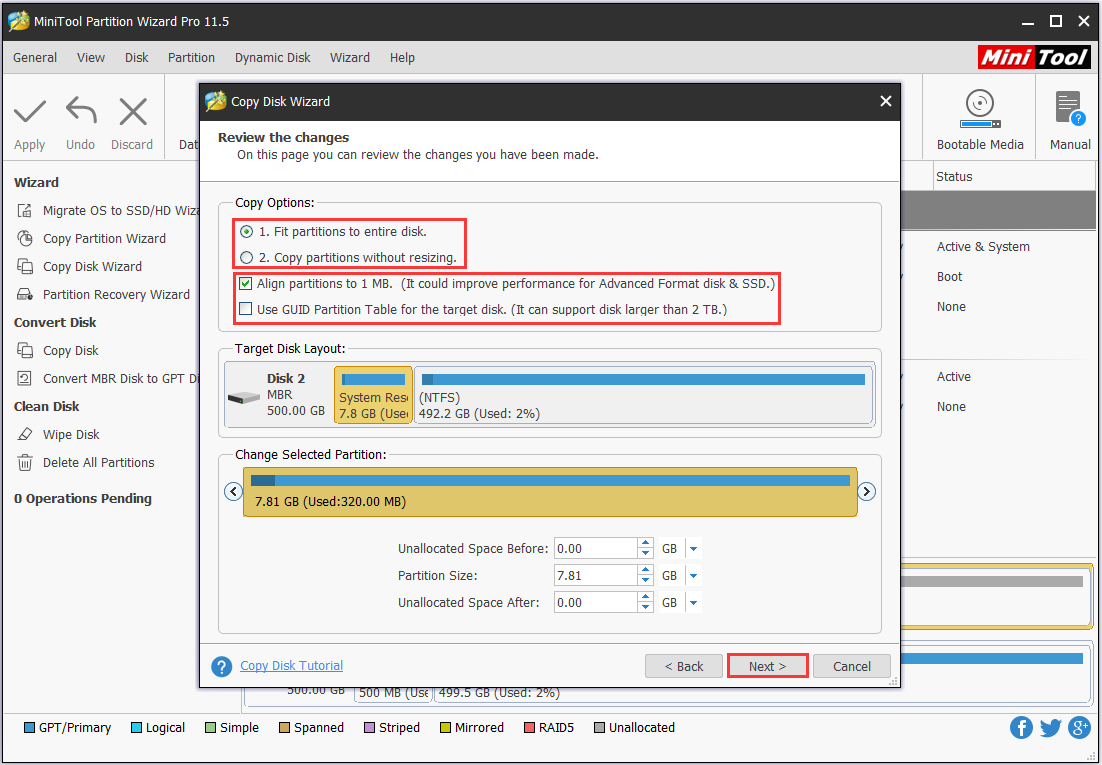
Step 5: Yous will exist reminded to configure computer BIOS settings then as to kick from the new disk. Click "End" then. Press "Apply" button on the card bar to start the copy. MiniTool Partition Sorcerer needs a restart to finish the job.
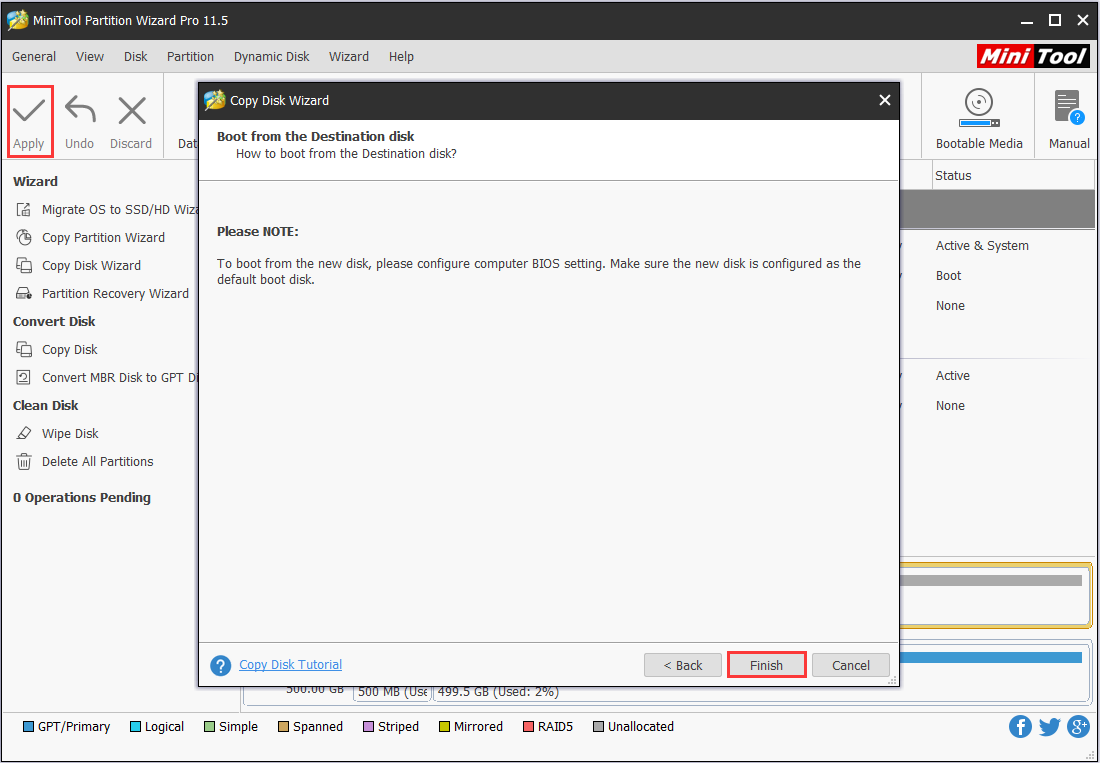
When MiniTool Partition Wizard completes, you can set your PC to boot from the larger hard bulldoze. In improver, you tin can further configure your hard drives using this free partitioning managing director.
Tip: If y'all are interested in Windows 10 migration, our guide How Can Yous Migrate Windows 10 to SSD without Reinstalling Bone will lead you lot through all the steps easily.
But if you practice non accept a larger hard drive or you do not have the plan to buy a new drive, we still accept the best options for you. How to clean your computer Windows 10? Nosotros just continue reading.
Fix #2: Empty Recycle Bin
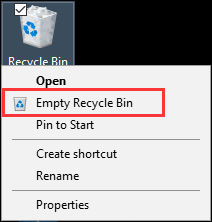
Files we delete usually go to the Recycle Bin if not permanently deleted. If you practice non clean the Recycle Bin for a long time, there tin can be a big number of unwanted files. So the beginning trying we think is to empty the Recycle Bin. Right-click the Recycle Bin on Windows ten desktop and choose "Empty Recycle Bin" from the context bill of fare, thus helping deejay cleanup Windows 10.
Fix #3: Disk Cleanup
Windows Disk Cleanup is a hard bulldoze cleaner usually used by advanced users to remove unnecessary files, including system files, system restore and shadow copies, which can help users to regain free space. To use Deejay Cleanup utility in Windows 10, follow these steps:
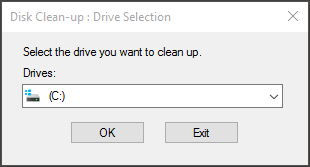
Step 1: At Cortana search box, blazon "deejay cleanup" and choose "Deejay Clean-up" from the best match.
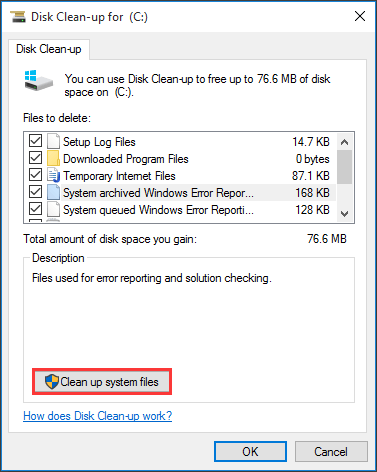
Step 2: In the pop-upward window, the organisation drive is selected by default. Unremarkably, only the C drive contains the unnecessary files. Click "OK" to go along.
Pace iii: Later on several minutes' computing, you will see how much disk infinite you can get in total past deleting all files listed in the box, including:
- Windows Upgrade Log Files.
- Setup Log File.
- Downloaded Programme Files.
- Temporary Internet Files.
- System archived/queued Windows Error Reporting.
- Delivery Optimization Files.
- Recycle Bin.
- Temporary Windows Installation Files.
- Previous Windows installation(southward).
Note: The available options you can select may be different. For example, if the previous Windows x is already deleted, you won't find the "Previous Windows installation(s)" pick.
Select the file types you want to remove and click "OK".
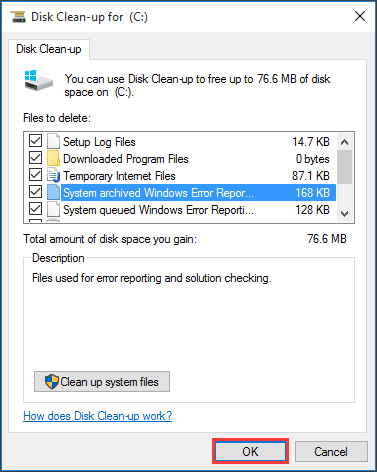
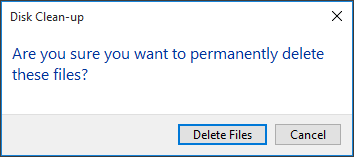
Step four: Confirm that you desire to permanently delete theses files.
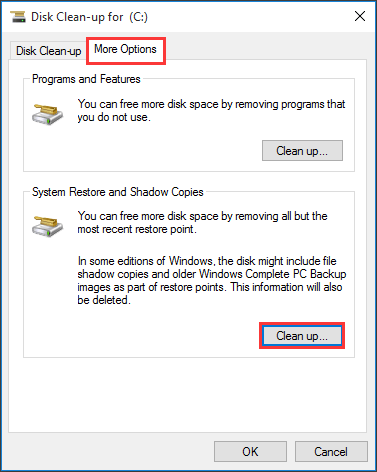
Tip: To gratuitous upwards more disk space, you can besides select "Clean upwardly organization files" or become to "More Options" to delete system restore and shadow copies.
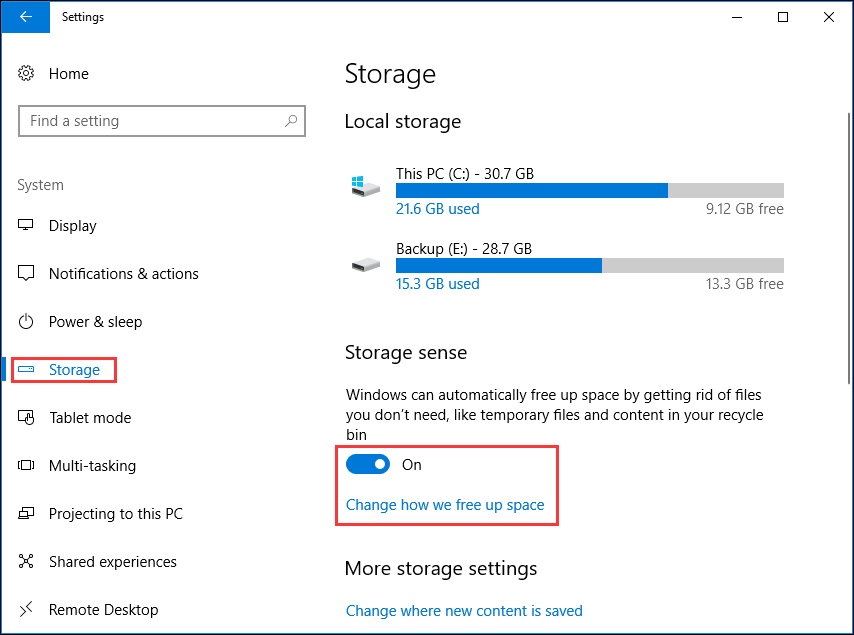
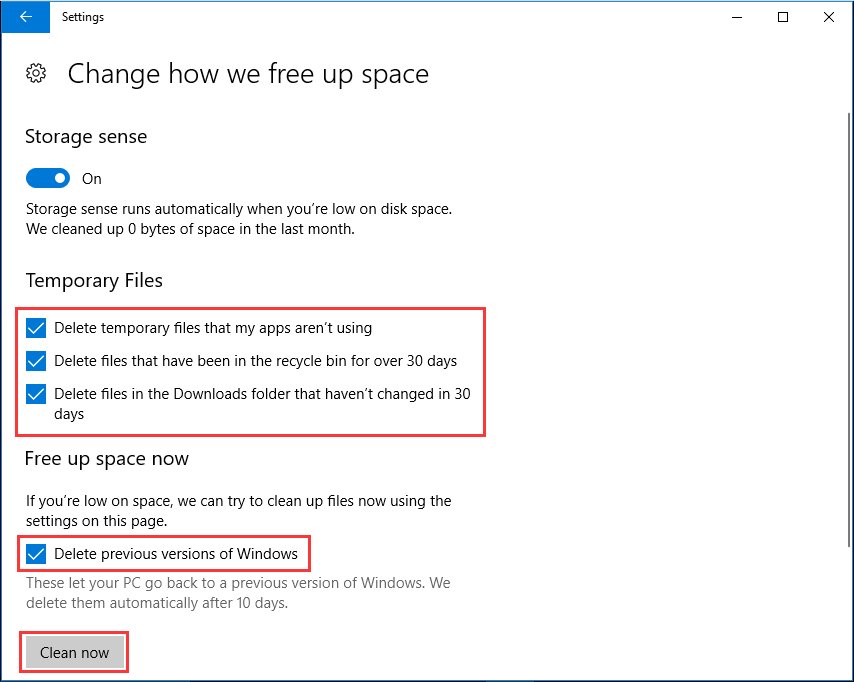
Ready #4: Enable Storage Sense
Storage Sense is an optional characteristic that can delete temporary files, files in the Recycle Bin for more than xxx days, files in the download folder that haven't changed in 30 days, as well equally the previous version of Windows 10 later an upgrade. If your Windows 10 is running on depression infinite, enabling Storage Sense helps gratis upward disk space Windows 10.
Follow the steps below to enable and gear up Storage Sense:
Pace ane: Click Windows 10 Kickoff card and open Settings. Then click on "System" and "Storage".
Step 2: Under "Storage sense," click on "Change how we free upwards infinite".
Stride iii: Under "Temporary files," bank check the files you want to delete, including:
- Delete temporary files that my apps aren't using.
- Delete files that have been in the recycle bin for over xxx days.
- Delete files in the Downloads binder that oasis't changed in 30 days.
Then nether "Free up space now," y'all tin can too select "Delete the previous versions of Windows". However, note that this option is simply available during the starting time 10 days after installing a new update. Finally, click "Clean at present" button for Windows x cleanup.
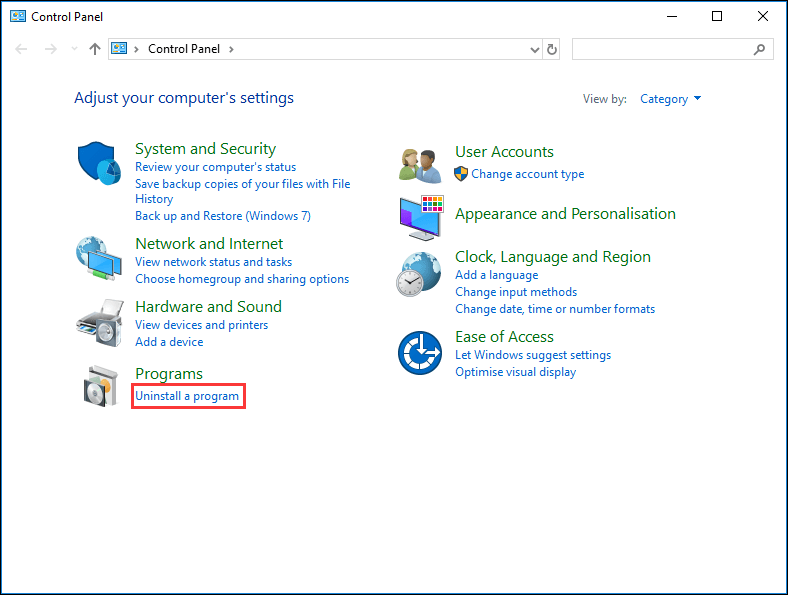
Prepare #5: Uninstall Apps You Never Use
To make disk cleanup Windows x, scan your applications and remove the ones that you don't use is helpful. For example, y'all tin can uninstall those that came preinstalled with your reckoner or the ones that you installed for one-time problem-solving usage.
Footstep 1: Open Windows x control console and click "Uninstall a program".
Step ii: Select the unwanted app or game, and click the "Uninstall" push button.
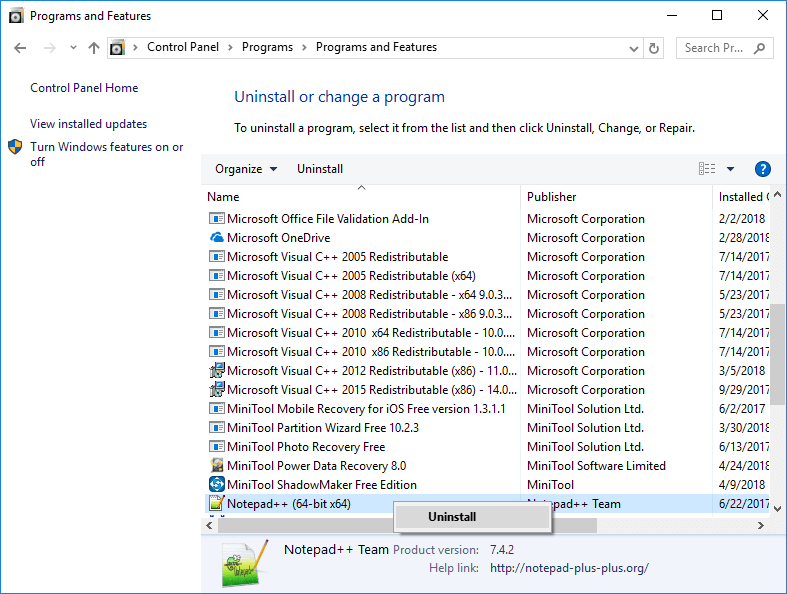
Tip: Pay attention to the size of each program. This will help you find out the items you should consider removing.
Step 5: Repeat the aforementioned instructions to remove more than games and apps that y'all don't need anymore.
Fix #six: Utilise OneDrive Files on Need Feature
OneDrive Files on Demand is a new characteristic introduced to Windows 10 with the Fall Creators Update, which allows you to access your files saved in OneDrive by scanning Windows ten File Explorer instead of having to salve them in local storage and synchronize them in the cloud.
If PC is running out of space, use Files on Demand to upload and continue your files in OneDrive and download them but when y'all need them.
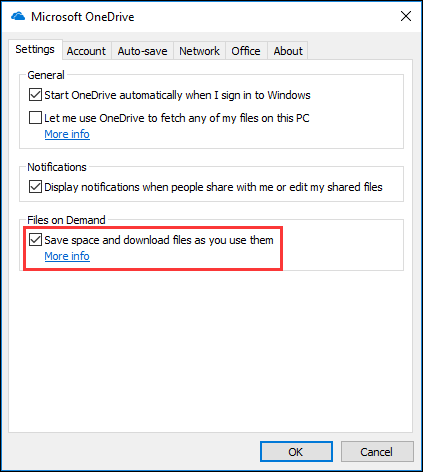
Showtime Movement: Enable OneDrive Files on Need Feature
Step i: Right-click the OneDrive deject icon in the notification surface area, and select "Settings".
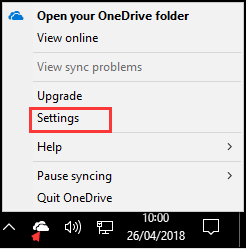
Step 2: In the popular-up window, navigate to the "Settings" tab. Then check the "Save infinite and download files as you use them" under "Files on Demand" to enable this feature. Finally, click "OK".
2nd Move: Complimentary up Disk Space
Now you lot tin motion your files to the OneDrive folder and brand them available only online to costless up disk space Windows 10.
Pace 1: Open your OneDrive folder.
Step 2: Select the files and folders to go on but in the deject. So correct-click the pick and choose "Clear space".
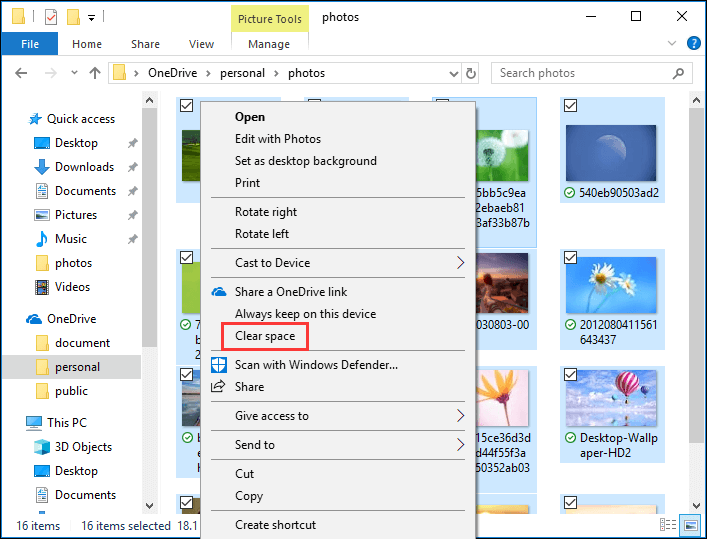
When finished, the icon under each file inverse to a white cloud. Yous will exist able to access them in File Explorer when there is network connection. To gratis up more disk space, you tin motion some files saved in the default folders to the OneDrive binder, so repeat the above steps to gratuitous up disk space Windows ten.
It'southward worth mentioning that you lot can only save up to 5GB files if you are using the gratis version of OneDrive.
Prepare #vii. Apply Meaty Os
Compact Bone is Microsoft's newest take on Windows 10. Information technology decreases the operating system'south size and enables you lot to run the operating organization from compressed files. Information technology also reduces the footprint of Windows apps. For Windows 10 cleanup, you can reclaim 2GB effectually disk space enabling Meaty OS.
Warning: This will alter system files, not clear whether it will affect computer performance, so we suggest using this way only when you have no other pick. In addition, so improve make a Windows x image backup earlier proceeding.
Footstep i. Run Command Prompt as ambassador and allow its changes to your PC.
Step 2. Type the following command to compress the Windows 10 and applications and press the Enter key:
Meaty.exe /CompactOS:always
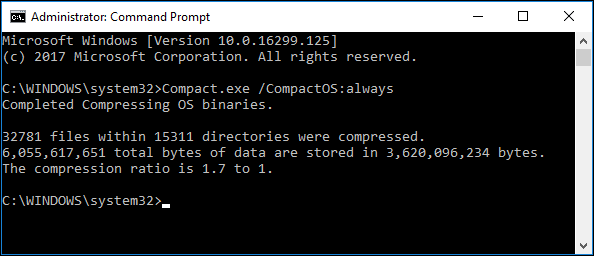
The whole process can take about 10 to twenty minutes, delight be patient.
Tip: To revert the change, use this control instead: Meaty.exe /CompactOS:never
Fix #8. Disable Hibernation on Windows 10
Hibernation is a feature that saves the content in retention to the hard drive, thus you can shut down your device completely without losing the current session. Although Hibernation is useful, information technology requires several gigabytes of disk space to save the content in RAM to the hiberfil.sys file on the hard drive.
If you want to optimize the available storage on your computer, you tin disable the feature for Windows 10 cleanup.
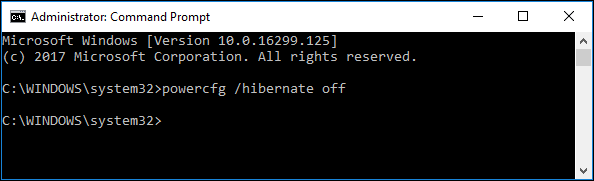
Step one: Search for Command Prompt, right-click the outcome, and select Run every bit administrator.
Footstep 2: Type the following command to turn off Hibernation and press Enter:
powercfg /hide off
Prepare #ix. Move Files to External Difficult Drive
Commonly, for convenience, nosotros would save files to local storage instead of an external hard drive or removable devices. However, to overcome the storage limitation, you should consider saving files to external hard drive if you're still low in capacity after trying all methods.
With an external hard drive, you can move existing files on your Windows 10 to the new storage. Also, you can change the default file storage location for the new content, making more room on the main system bulldoze.
First Move: Move Existing Files to External Hard Drive
Step i: Connect the removable drive.
Step 2: Open File Explorer and then go to the location where you have files to movement.
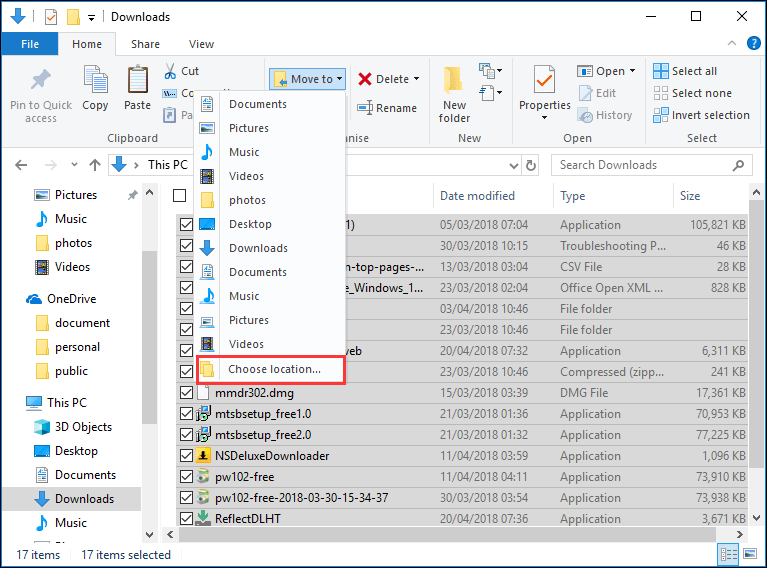
Step iii: Select the items you want to relocate and click the "Motility to" push under "Habitation" (You may need to printing Ctrl + F1 then every bit to aggrandize the ribbon.) Then select "Choose location…"
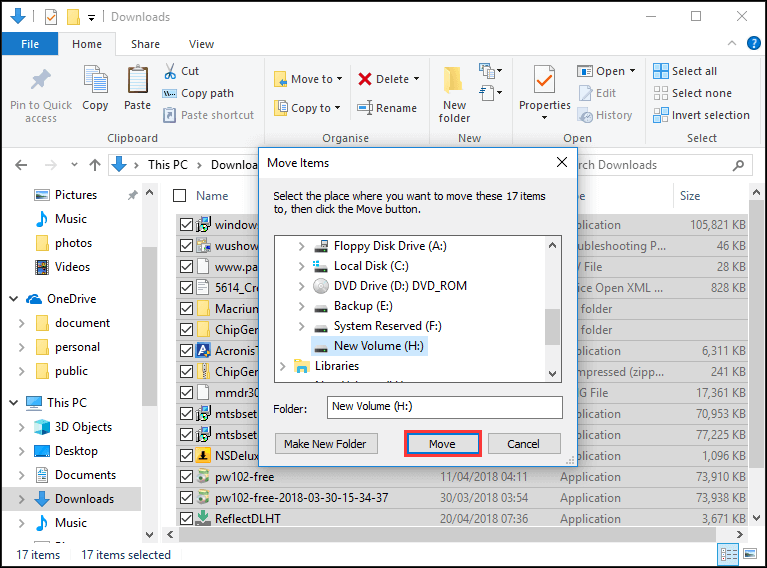
Footstep 4: In the pop-up window, select the external hard drive and click the "Move" button.
You'll need to repeat the steps to move files on other locations to the new external drive. If you want to move all files on a specific partition, you tin can use "Re-create Partition" feature of MiniTool Partition Sorcerer Gratis.
Second Move: Save New Content to the New Drive
Also, for reckoner cleanup, you tin can appoint the locations for new contents. To automatically salve files to a new location, you can use these steps:
Footstep 1: Connect the removable bulldoze to your PC.
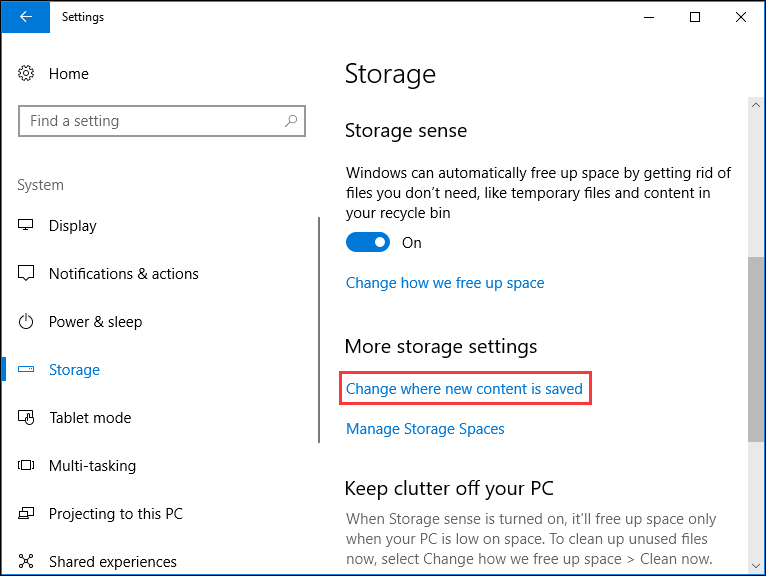
Footstep 2: Open up Settings -> Arrangement -> Storage.
Footstep iii: Nether "More storage settings", click "Change where new content is saved".
Stride four: Use the drop-down menu to select the new location that Windows 10 should use to salve new files automatically for each file type.
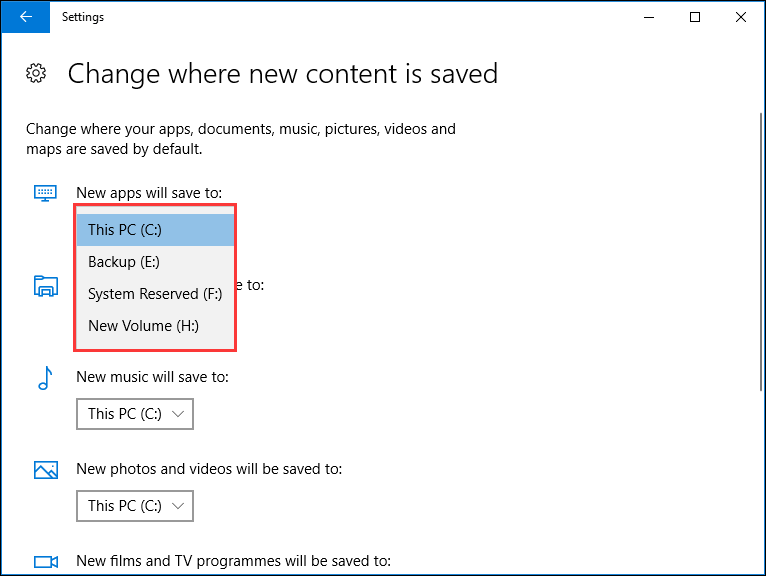
When completes, Windows 10 and related apps will save files to the new specified location, making more room for your system bulldoze.
Hither are 9 solutions to Windows ten disk cleanup. I tried the first one and it works groovy. Wondering what to practice? Follow the guide in this article and check out which i helps estimator cleanup.Click to tweet
Bottom Line
Reading here, we believe y'all have got some skills in coping with Windows x deejay cleanup. Practise you know more ways for disk cleanup Windows 10? Share your tip in the comment section. For any questions towards using MiniTool software, contact united states of america via[email protected].

How To Clear Disk Space On Windows,
Source: https://www.partitionwizard.com/partitionmagic/disk-cleanup-win-10.html
Posted by: saxontiontems.blogspot.com
0 Response to "How To Clear Disk Space On Windows"
Post a Comment